텐서플로우를 이용해서 이미지 분류 앱 만들기
1. Teachavle Machine을 사용해서 이미지 학습 시킨 ML 모델 만들기.
( https://teachablemachine.withgoogle.com/ )
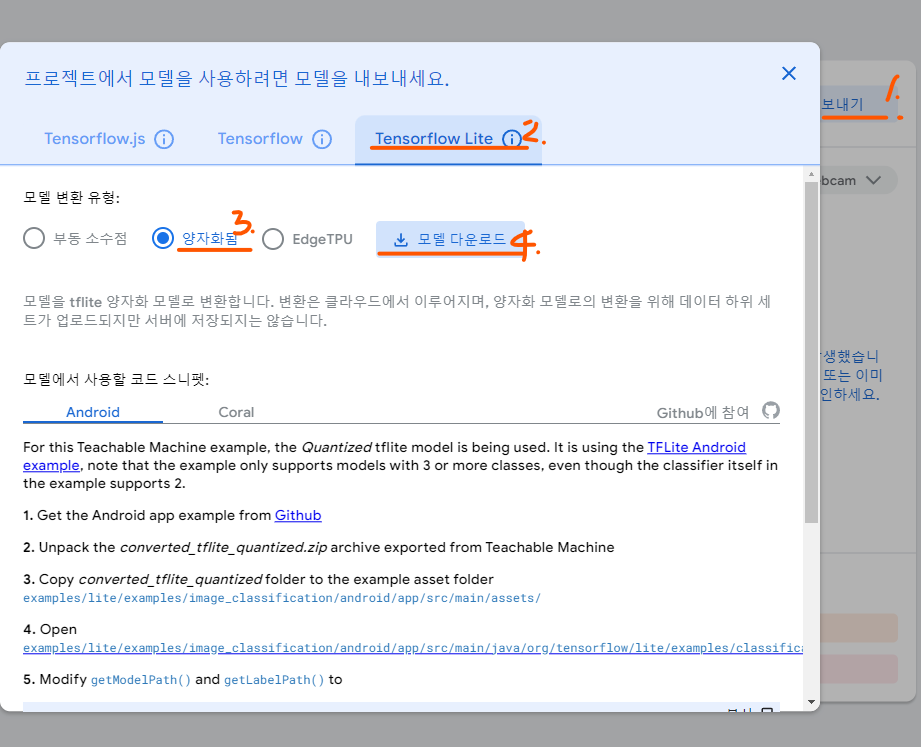
- 중요. Tensorflow Lite로 해야 앱에서 사용이 가능하다
- 모델 다운로드 하는 다운로드하는 것에는 시간이 조금 필요하다. 잘 다운로드하는 중이니 걱정하지 말자!


2. 안드로이드 스튜디오
2-1. res/layout/해당 xml 파일 코드
- 답변이 해당 액티비티의 길이보다 길어질 수 있으므로, 스크롤이 가능하도록 NestedScrollView 사용.
<?xml version="1.0" encoding="utf-8"?>
<RelativeLayout xmlns:android="http://schemas.android.com/apk/res/android"
    xmlns:app="http://schemas.android.com/apk/res-auto"
    xmlns:tools="http://schemas.android.com/tools"
    android:layout_width="match_parent"
    android:layout_height="match_parent"
    android:background="#FFFFFF"
    tools:context=".MainActivity">

    <androidx.core.widget.NestedScrollView
        android:layout_width="match_parent"
        android:layout_height="wrap_content">

        <RelativeLayout
            android:layout_width="match_parent"
            android:layout_height="match_parent">

        <TextView
            android:id="@+id/textView2"
            android:layout_width="match_parent"
            android:layout_height="wrap_content"
            android:layout_marginTop="30dp"
            android:gravity="center"
            android:text="꽃 사진을 찍어서 보여주세요!"
            android:textColor="#000000"
            android:textSize="20sp" />

        <TextView
            android:id="@+id/textView"
            android:layout_width="match_parent"
            android:layout_height="wrap_content"
            android:layout_below="@id/textView2"
            android:gravity="center"
            android:text="FLETTER의 꽃으로 학습된\n인공지능이 어떤 꽃인지 예측하고\n꽃말을 알려줍니다 :)"
            android:textColor="#000000"
            android:textSize="16sp" />

        <ImageView
            android:id="@+id/imageView"
            android:layout_width="250sp"
            android:layout_height="250sp"
            android:layout_below="@id/textView"
            android:layout_centerHorizontal="true"
            android:layout_marginTop="20dp"
            app:srcCompat="@drawable/add_a_photo_24dp_666666" />

        <Button
            android:id="@+id/button"
            android:layout_width="match_parent"
            android:layout_height="wrap_content"
            android:layout_below="@id/imageView"
            android:layout_alignParentBottom="false"
            android:layout_centerVertical="false"
            android:layout_marginLeft="30dp"
            android:layout_marginTop="10dp"
            android:layout_marginRight="30dp"
            android:backgroundTint="#FCF6BD"
            android:text="꽃 사진을 찍어\n 꽃 이름 예측하기"
            android:textAllCaps="false"
            android:textColor="#000000"
            android:textSize="16sp"
            android:textStyle="bold" />

            <TextView
                android:id="@+id/confidencesText"
                android:layout_width="match_parent"
                android:layout_height="wrap_content"
                android:layout_below="@id/button"
                android:layout_alignParentEnd="false"
                android:layout_alignParentBottom="false"
                android:layout_marginLeft="30dp"
                android:layout_marginTop="30dp"
                android:layout_marginRight="30dp"
                android:gravity="center"
                android:text="예측된 꽃 이름"
                android:textSize="16sp"
                android:textStyle="bold" />

            <TextView
                android:id="@+id/result"
                android:layout_width="match_parent"
                android:layout_height="wrap_content"
                android:layout_below="@id/confidencesText"
                android:layout_alignParentEnd="false"
                android:layout_alignParentBottom="false"
                android:layout_marginLeft="30dp"
                android:layout_marginTop="0dp"
                android:layout_marginRight="30dp"
                android:gravity="center"
                android:text=""
                android:textColor="#C30000"
                android:textSize="16sp"
                android:textStyle="bold" />

            <TextView
                android:id="@+id/confidence"
                android:layout_width="match_parent"
                android:layout_height="wrap_content"
                android:layout_below="@id/classified"
                android:layout_alignParentEnd="false"
                android:layout_alignParentBottom="false"
                android:layout_marginLeft="30dp"
                android:layout_marginTop="0dp"
                android:layout_marginRight="30dp"
                android:gravity="center"
                android:text=""
                android:textColor="#000"
                android:textSize="16sp" />

            <TextView
                android:id="@+id/classified"
                android:layout_width="match_parent"
                android:layout_height="wrap_content"
                android:layout_below="@id/result"
                android:layout_alignParentEnd="false"
                android:layout_alignParentBottom="false"
                android:layout_marginLeft="30dp"
                android:layout_marginTop="20dp"
                android:layout_marginRight="30dp"
                android:gravity="center"
                android:text="다음과 같이 분류 됩니다."
                android:textSize="16sp"
                android:textStyle="bold" />
        </RelativeLayout>
    </androidx.core.widget.NestedScrollView>
</RelativeLayout>
2-2. app/manifests/AndroidManifest.xml 파일에 카메라 기능을 추가한다.
    <uses-feature
        android:name="android.hardware.camera"
        android:required="true" />

    <uses-permission android:name="android.permission.CAMERA" />
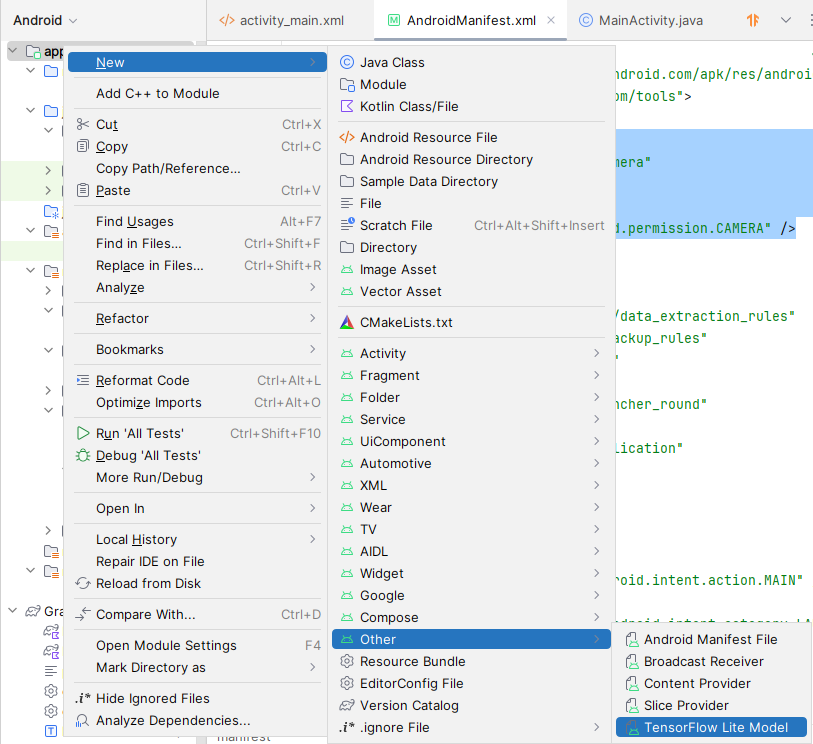
2-3. 학습된 ML 모델을 가져온다.
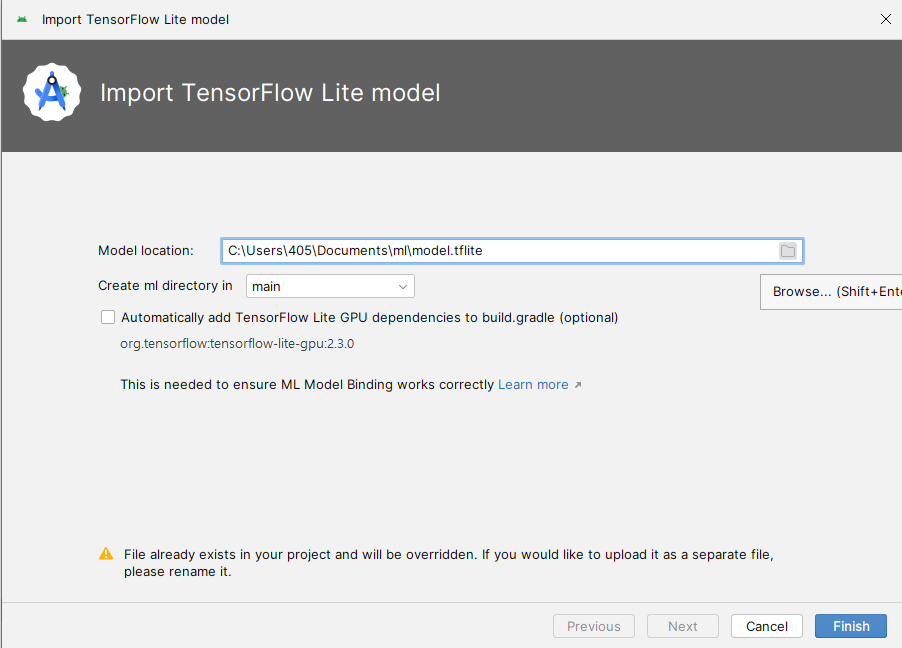
- app 우클릭 -> new -> Other -> Tensorflow Lite Model 선택.
- 다운로드된 파일 모델 이름 model.tflite로 변경 후 찾아서 선택해 주기
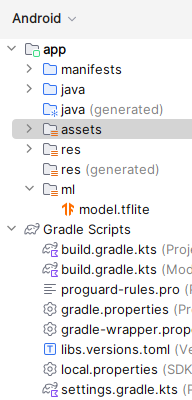
- 기본 설정 그대로 두고 Finish 누르면 ml 폴더가 만들어졌다.
2-4. MainActivity.java 코드 작성
본인 패키지 그래로 두기

import androidx.annotation.Nullable;
import androidx.annotation.RequiresApi;
import androidx.appcompat.app.AppCompatActivity;

import android.Manifest;
import android.content.Intent;
import android.content.pm.PackageManager;
import android.graphics.Bitmap;
import android.media.ThumbnailUtils;
import android.os.Build;
import android.os.Bundle;
import android.provider.MediaStore;
import android.view.View;
import android.widget.Button;
import android.widget.ImageView;
import android.widget.TextView;

import org.tensorflow.lite.DataType;
import org.tensorflow.lite.support.tensorbuffer.TensorBuffer;

import 본인 패키지(예 com.dd.myapplication).ml.Model;

import java.io.IOException;
import java.nio.ByteBuffer;
import java.nio.ByteOrder;


public class MainActivity extends AppCompatActivity {

    // 분류 결과와 신뢰도 표시
    TextView result, confidence;
    // 선택된 이미지를 표시
    ImageView imageView;
    // 이미지를 선택 할 버튼
    Button picture;
    // 이미지 크기
    int imageSize = 224;

    @Override
    protected void onCreate(Bundle savedInstanceState) {
        super.onCreate(savedInstanceState);
        setContentView(R.layout.activity_main);

        result = findViewById(R.id.result);
        confidence = findViewById(R.id.confidence);
        imageView = findViewById(R.id.imageView);
        picture = findViewById(R.id.button);

        picture.setOnClickListener(new View.OnClickListener() {
            @RequiresApi(api = Build.VERSION_CODES.M)
            @Override
            public void onClick(View view) {
                // 권한이 있는 경우 카메라 실행
                if (checkSelfPermission(Manifest.permission.CAMERA) == PackageManager.PERMISSION_GRANTED) {
                    Intent cameraIntent = new Intent(MediaStore.ACTION_IMAGE_CAPTURE);
                    startActivityForResult(cameraIntent, 1);
                } else {
                    // 카메라 권한이 없으면 요청
                    requestPermissions(new String[]{Manifest.permission.CAMERA}, 100);
                }
            }
        });
    }

    // 이미지 분류하는 메서드
    public void classifyImage(Bitmap image){
        try {
            Model model = Model.newInstance(getApplicationContext());

            // 입력 데이터 생성
            TensorBuffer inputFeature0 = TensorBuffer.createFixedSize(new int[]{1, 224, 224, 3}, DataType.FLOAT32);
            ByteBuffer byteBuffer = ByteBuffer.allocateDirect(4 * imageSize * imageSize * 3);
            byteBuffer.order(ByteOrder.nativeOrder());

            // 224 * 224 픽셀 이미지 배열 생성
            int [] intValues = new int[imageSize * imageSize];
            image.getPixels(intValues, 0, image.getWidth(), 0, 0, image.getWidth(), image.getHeight());

            // 픽셀 데이터를 바이트 버퍼에 추가
            // 바이트 버퍼 설명 : https://kangmoo.github.io/posts/Java-ByteBuffer/
            int pixel = 0;
            for(int i = 0; i < imageSize; i++){
                for(int j = 0; j < imageSize; j++){
                    int val = intValues[pixel++]; // RGB
                    byteBuffer.putFloat(((val >> 16) & 0xFF) * (1.f / 255.f));
                    byteBuffer.putFloat(((val >> 8) & 0xFF) * (1.f / 255.f));
                    byteBuffer.putFloat((val & 0xFF) * (1.f / 255.f));
                }
            }

            inputFeature0.loadBuffer(byteBuffer);

            // 모델 추론을 실행 및 결과 가져온다
            Model.Outputs outputs = model.process(inputFeature0);
            TensorBuffer outputFeature0 = outputs.getOutputFeature0AsTensorBuffer();

            float[] confidences = outputFeature0.getFloatArray();
            // 가장 높은 신뢰도의 클래스를 찾는다.
            int maxPos = 0;
            float maxConfidence = 0;
            for(int i = 0; i < confidences.length; i++){
                if(confidences[i] > maxConfidence){
                    maxConfidence = confidences[i];
                    maxPos = i;
                }
            }

            // 내가 학습시킨 클래스 이름
            String[] classes = {"튤립", "장미", "데이지"};
            result.setText(classes[maxPos]);

            // 각 클래스의 신뢰도를 문자열로 생성
            String s = "";
            for(int i = 0; i < classes.length; i++){
                s += String.format("%s: %.1f%%\n", classes[i], confidences[i] * 100);
            }
            confidence.setText(s);


            // 모델 리소스 해제
            model.close();
        } catch (IOException e) {
            // TODO 예외 처리
        }
    }

    // 활동 결과를 처리하는 메서드
    @Override
    public void onActivityResult(int requestCode, int resultCode, @Nullable Intent data) {
        if (requestCode == 1 && resultCode == RESULT_OK) {
            Bitmap image = (Bitmap) data.getExtras().get("data");
            int dimension = Math.min(image.getWidth(), image.getHeight());
            image = ThumbnailUtils.extractThumbnail(image, dimension, dimension);
            imageView.setImageBitmap(image);

            image = Bitmap.createScaledBitmap(image, imageSize, imageSize, false);
            classifyImage(image);
        }
        super.onActivityResult(requestCode, resultCode, data);
    }
}
3. 앱 실행하기

결과.

참고.
* 유튜브
https://www.youtube.com/watch?v=gtkIRBkBeYI
* 깃허브
https://github.com/IJ-Apps/Image-Classification-App-with-Teachable-Machine/tree/main
GitHub - IJ-Apps/Image-Classification-App-with-Teachable-Machine: Android app that uses a TensorFlow Lite model for image classi
Android app that uses a TensorFlow Lite model for image classification of common objects, trained through Google's Teachable Machine. - IJ-Apps/Image-Classification-App-with-Teachable-Machine
github.com


